VNC on Sherlock
Virtual Network Computing (VNC) is a protocol and framework to facilitate remote access to graphical desktop interfaces on workstations and High Performance Computing (HPC) platforms. VNC is typically lighter and faster than, and therefore preferred over, X11 forwarding and other methods native to Linux.
VNC is not supported by Sherlock. Attempting to compile VNC on Sherlock will most like end in an unsatisfied dependency for a window managment library. This library is – by design, not provided on the compute nodes and is non-trivial (if at all possible) to install as a user. Therefore, to use VNC on Sherlock, it must be run from a container; see containers.md. Nominally speaking, this means that your program will need to be bundled into the same container. As will be discussed below, this can be accomplished either by including (copy-pasting) in an application container, or an application container can be “composed,” or build using a VNC container as a basis or “Bootstrap.”
Note that, at this point VNC containers on Sherlock are very much a “Beta”, experimental product. They are likely to be clunky and limited in their function. Their principal purpose – at this time is to provide a graphics exchange protocol, to facilitate GUI and graphics intensive applications, with better response and stability than X11.
VNC Containers
VNC is essentially a protocol with many implementations. In the HPC domain, popular distributions include,
- TurboVNC
- TigerVNC
- RealVNC
- TightVNC
- UltraVNC
Of those that do not require a license – eg. RealVNC, TigerVNC and TurboVNC are arguably popular standards. This documentation focuses on TurboVNC for no especial reason except that it turned out to be our path of least resistance during development. Considerations included,
- Ease of installation, either a reliable
cmake ..; makeworkflow or distribuiton installer packages, egapt, apt-get, yum, dnffor Debian- and RedHat-like Linux - Quality of documentation
- Function on Ubuntu and Rocky-9 based containers
Effots to date, then have focused on two famlies of containers based on:
- Ubuntu + TurboVNC
- Rocky-9 + TurboVNC
Application containers are then derived from these “base” containers. The Ubuntu containers are typicallty preferred – for ease of use, but some applications (eg. Abaqus, ComSol) may prefer or require Rocky Linux – or some other RedHat or CENTOS variant.
Using a VNC Container
Overview
VNC consists of separate Client and Server applications. The VNC Server runs on the host machine – where the application will run, eg. Sherlock or some other HPC platform, and in this case, more specifically in a container running on the host. The VNC Client application runs on a laptop, workstation, or other terminal. Nominally the compute load on the server side greately exceeds the compute load on the client – which is often the main point of using VNC in the first place. Sample container scripts for Rocky-9 and Ubuntu + VNC are shown below.
Literature broadly suggests that most web browsers include a VNC plugin and can be used as a VNC client, eg by navigating to localhost:5901. This apepars to often not be the case, but dedicated VNC client software is abundant and usually free. VNC clients should be cross-compatible with most VNC Servers, but for compatiblity and simplicty, we focus this documentaiotn on the Turbo VNC client, which can be found via a standard web search, or is likely located here: https://turbovnc.org.
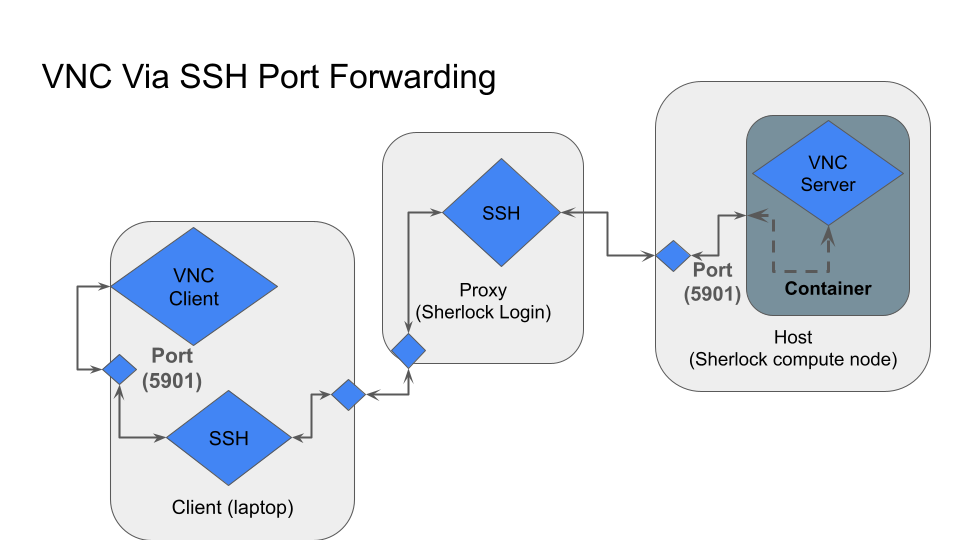
Fig. 1: Diagram of VNC running, in a container, on a Sherlock compute node. On the HPC, or other remote, connection, the local machine uses SSH port-forwarding to forward a local port to the VNC port on the host (VNC server) machine. The default port number for VNC is 5901; the VNC server can be configured to use a different port, and (more or less) any local port can be forwarded. Apptainer automatically exposes and matches ports between the container and the host, so when we map to compute_node:5901, Apptainer automatically maps compute_node:5901 -> container:5901. In this setup, the connection to the remote server is made by connecting to the client to itself, on the forwarded port, eg. localhost:5901. See section on SSH forwarding for more details.
VNC Example
Obtain or build a container
A few sample containers can be found at,
/home/groups/sh_support/share/software/no_arch/vnc-apptainers
These likely include both container recipes *.def and built containers *.sif. The astute reader might also notice that this directory is a Git(Hub) repository. Containers can be run directly from this location or – probably better for most applications, copied or built in a local ($SCRATCH) space. For example, to build a the base Ubuntu + VNC condainer,
mkdir -p $SCRATCH/apptainer/VCN
cd $SCRATCH/apptainer/VCN
# NOTE: this copy step is optional, if you want to modify the build script locally.
cp /home/groups/sh_support/share/software/no_arch/vnc-apptainers/basic_ubuntu_vnc.def ./
apptainer build ubuntu-vnc.sif  basic_ubuntu_vnc.def
Launch and SSH-forward VNC
To run VNC, first start the container. In this case, we use the shell mode, but it is also possible to use exec or to write a run script,
[$USER@sh03-08n53] (job 7751926) $ apptainer shell ubuntu-vnc.sif
Apptainer>
To experiment with installing new packages to the container (which should eventually be integrated into the build script) or to debug other issues, it might be necessary to use --fakeroot and to establish a writable filesystem,
apptainer shell --fakeroot --writable-tmpfs ubuntu-vnc.sif
For the time being, we will leave sandbox type containers, filesysem --bind, and other advanced features as an exercise for the reader. Now run some quick diagnostics and start vncserver.
There should be no active desktops:
Apptainer> vncserver -list
TurboVNC sessions:

X DISPLAY #	PROCESS ID	NOVNC PID	UDS PATH
There may be some warnings or “setting locale failed” messages, which can be ignored. The important thing is that there are currently no open displays – perhaps left over from an old container. If there are displays at this stage, they should be closed using:
vncserver -kill :{display_number}
eg,
vncserver -kill :1
Otherwise, start vncserver and check again:
Apptainer> vncserver

Desktop 'TurboVNC: sh03-08n53.int:1 (myoder96)' started on display sh03-08n53.int:1

Starting applications specified in /opt/TurboVNC/bin/xstartup.turbovnc
Log file is /home/users/myoder96/.vnc/sh03-08n53.int:1.log

Apptainer> vncserver -list

TurboVNC sessions:

X DISPLAY #	PROCESS ID	NOVNC PID	UDS PATH
:1		905
Apptainer>
Before we can connect to this server, we need to connect to the port. First, find the name of your compute node by either running the command hostname or by copying it from your command prompt, eg. for the example in this doc, the command prompt is [$USER@sh03-08n53] (job 7751926)$; the machine name is sh03-08n53. In a separate terminal tab or window – from your client machine (laptop),
ssh -L5901:sh03-08n53:5901 sherlock.stanford.edu
Read the output carefully. If the port forward is not allowed, maybe because that port is already forwarded from another session, simply forward a different port, eg.
ssh -L5902:sh03-08n53:5901 sherlock.stanford.edu
Your VNC server should be ready now. To connect, open your (TurboVNC) VNC client and connect to, localhost:5901 (or to the port you forwarded in the previous step, eg. localhost:5902 if 5901 was not available).
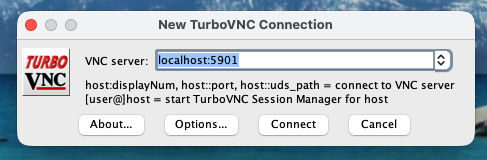
Fig. 2: TurboVNC client. Various VNC Client-Server combinations should be mutually compatible.
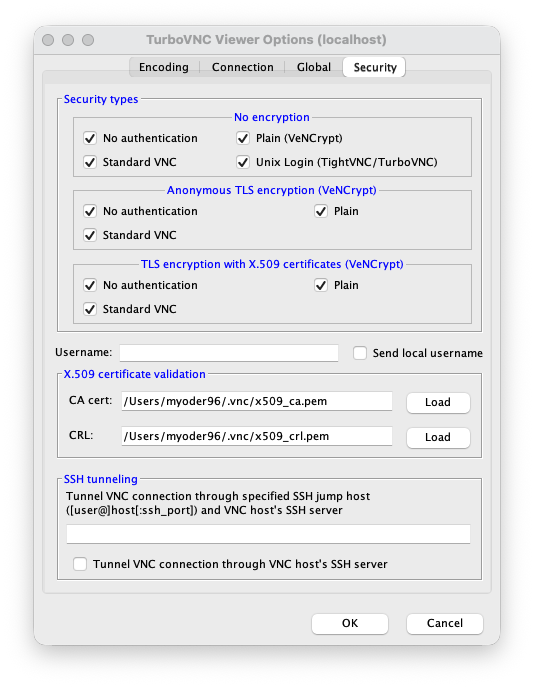
Fig. 3: TurboVNC client security settings.
Container Scripts
Here, we include some simple sample scripts. These scripts are likely not properly optimized, but should work.
VNC + Ubuntu
Bootstrap: docker
From: ubuntu:latest

%post
    apt-get update
    apt-get -y install vim nano
    #
    #
    apt-get install -y --no-install-recommends \
        xfce4 \
        xfce4-goodies \
        dbus-x11 \
        xterm
    apt-get install -y libcurl4-openssl-dev --fix-broken
    #
    # Set xfce4-terminal as default terminal emulator:
    update-alternatives --set x-terminal-emulator /usr/bin/xfce4-terminal.wrapper

    # TurboVNC:
    apt-get -y install wget gpg
    apt-get -y install lsb-release


    #echo "deb bit done..."
    wget -q -O- "https://packagecloud.io/dcommander/turbovnc/gpgkey" | gpg --dearmor > "/etc/apt/trusted.gpg.d/TurboVNC.gpg"
    wget -q -O "/etc/apt/sources.list.d/TurboVNC.list" "https://raw.githubusercontent.com/TurboVNC/repo/main/TurboVNC.list"

    wget -q -O- https://packagecloud.io/dcommander/libjpeg-turbo/gpgkey | gpg --dearmor >/etc/apt/trusted.gpg.d/libjpeg-turbo.gpg
    wget -q -O "/etc/apt/sources.list.d/libjpeg-turbo.list" "https://raw.githubusercontent.com/libjpeg-turbo/repo/main/libjpeg-turbo.list"

    wget -q -O- https://packagecloud.io/dcommander/virtualgl/gpgkey | gpg --dearmor >/etc/apt/trusted.gpg.d/VirtualGL.gpg
    wget -q -O "/etc/apt/sources.list.d/VirtualGL.list" "https://raw.githubusercontent.com/VirtualGL/repo/main/VirtualGL.list"

    apt-get update
    apt-get -y install turbovnc
    apt-get -y install virtualgl libjpeg-turbo-official


    # Set VNC password (replace 'your_vnc_password' with a strong password)
    export PATH=/opt/TurboVNC/bin:${PATH}
#
#   There are ways to configure startup scripts, manage the desktop from the container, etc.,
#      but I don't use them.
#    mkdir -p /root/.vnc
#    echo "monkey018" | vncpasswd -f > /root/.vnc/passwd
#    chmod 600 /root/.vnc/passwd

#    # Configure xstartup script for XFCE
#    echo "#!/bin/bash" > /root/.vnc/xstartup
#    echo "unset SESSION_MANAGER" >> /root/.vnc/xstartup
#    echo "unset DBUS_SESSION_BUS_ADDRESS" >> /root/.vnc/xstartup
#    echo "[ -x /etc/vnc/xstx:artup ] && exec /etc/vnc/xstartup" >> /root/.vnc/xstartup
#    echo "[ -r \$HOME/.Xresources ] && xrdb \$HOME/.Xresources" >> /root/.vnc/xstartup
#    echo "startxfce4 &" >> /root/.vnc/xstartup
#    chmod +x /root/.vnc/xstartup

%environment
    export PATH=/opt/TurboVNC/bin:${PATH}

%runscript
    vncserver :1 -geometry 1024x768 -depth 24
    trap "vncserver -kill :1" EXIT
#    tail -f /root/.vnc/*.log # Keep the container running